Easy 3D Origami Heart Template | Free Valentine Craft
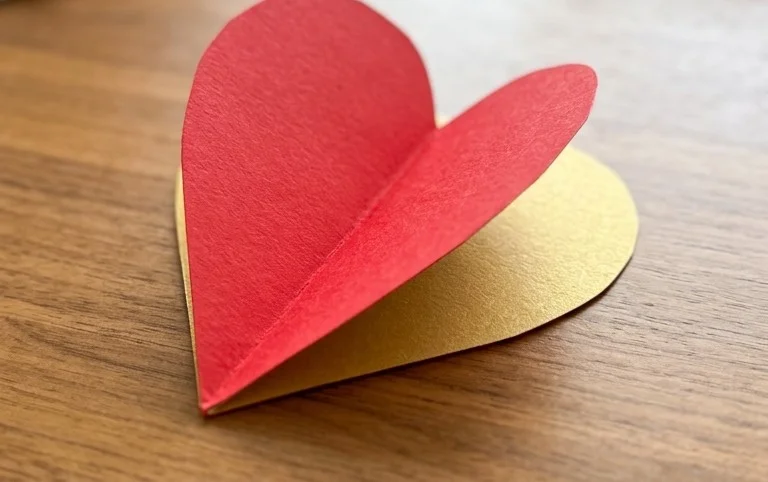
FREE template to make paper 3D heart for your Valentine! Get ready to craft a beautiful, fully formed paper heart that stands up on its own, perfect for showing someone special how much you care. This isn’t just a flat cutout; it’s a charming, dimensional piece that will look fantastic as a gift topper, a centerpiece, or just a sweet decoration. Whether you’re a complete beginner to origami, looking for a fun activity with kids, or need a last-minute handmade gift, this project is for you! It takes about 15-20 minutes from start to finish. In this tutorial, I’ll guide you step-by-step, showing you how to transform simple paper into this lovely 3D heart using our easy-to-follow template. Let’s get folding!

Create a Heartfelt Valentine with This Free 3D Origami Heart Template!
Hello there, crafty friends! Valentine’s Day is just around the corner, and what better way to express your love than with a handmade gift? Today, I’m absolutely delighted to share with you a simple yet stunning way to create a beautiful 3D origami heart. This project is perfect for beginners, requires no special tools, and the template is completely free for you to use! Get ready to fold your way into someone’s heart.
Choosing Your Paper: The Foundation of Your Fold
The paper you choose is crucial for a successful origami project. For this 3D heart, I recommend a few things to make folding as easy and enjoyable as possible.
Firstly, the type of paper. Standard copy paper is a good starting point for practice, but for a truly lovely finished heart, consider using origami paper. Origami paper is thin but strong, designed specifically for folding, and it holds creases beautifully. Cardstock is generally too thick for intricate folds like this, and it can make the final model bulky.
Secondly, the weight. Aim for a paper weight around 70-90 gsm (grams per square meter). This is typical for origami paper and will give you a good balance between being easy to fold and sturdy enough to hold its 3D shape. If you’re using printer paper, it will likely be a bit heavier, around 80 gsm, which is perfectly fine for this project, especially for your first few attempts.
Thirdly, the size. For this 3D heart, a square piece of paper measuring 6 inches by 6 inches (approximately 15 cm by 15 cm) is ideal. This size is manageable for beginners and produces a lovely, giftable-sized heart. You can certainly experiment with larger or smaller squares once you’re comfortable with the steps.
Finally, single-sided or double-sided? This is entirely up to you and the look you’re going for! If you use single-sided origami paper, the colour will be on one side, and white (or a different colour) on the other. This can create a nice contrast, especially as the model develops. If you use double-sided paper, both sides will be the same colour, resulting in a uniformly coloured heart. For a classic Valentine’s look, red or pink paper is perfect. But don’t be afraid to get creative with patterned papers, metallic finishes, or even recycled paper for a unique touch!
The Base Folds: Building Blocks of Your Heart
Before we dive into the step-by-step folding, let’s get familiar with a couple of fundamental folds that we’ll use repeatedly. Making these folds clean and precise will make all the difference in the final outcome.
The Valley Fold
A valley fold is when you fold the paper towards you, creating a “valley” or a concave crease. To make a clean valley fold, align the edges or corners you are bringing together perfectly. Once aligned, run your fingernail or a bone folder along the crease line firmly from one end to the other. This will set the crease sharply.
The Mountain Fold
A mountain fold is the opposite of a valley fold. You fold the paper away from you, creating a “mountain” or a convex crease. To make a mountain fold, you first usually make a valley fold along the intended mountain fold line. Then, you reverse that crease, pushing the paper outwards. Again, precision in alignment and a firm crease are key.
Now that we’ve got our paper and understand our basic folds, let’s start folding!
Step-by-Step Folding Sequence: Crafting Your 3D Heart
We’ll be working with our square piece of paper, coloured side down (if using single-sided paper).
1. Start with your square paper coloured side down.
2. Fold the paper in half horizontally, bringing the bottom edge up to meet the top edge. Crease firmly. You now have a rectangle.
3. Unfold the paper. You should have a horizontal crease in the middle.
4. Fold the paper in half vertically, bringing the left edge over to meet the right edge. Crease firmly. You now have a smaller rectangle.
5. Unfold the paper. You should have a vertical crease down the middle, intersecting the horizontal crease at the center.
6. Flip the paper over so the coloured side is now facing up.
7. Fold the bottom edge up to meet the center horizontal crease. Crease firmly.
8. Fold the top edge down to meet the center horizontal crease. Crease firmly. You now have a narrower rectangle.
9. With the paper still in this orientation, fold the right edge inwards to meet the vertical center crease. Crease firmly.
10. Fold the left edge inwards to meet the vertical center crease. Crease firmly. You should now have a square that is roughly one-quarter the size of your original paper.
11. Flip the entire model over so the coloured side is again facing down.
12. Take the bottom point and fold it upwards so that its tip meets the very top edge of the paper. Crease firmly.
13. Now, take the right side point of the fold you just made, and fold it inwards so the point aligns with the vertical center crease. Crease firmly.
14. Repeat step 13 on the left side. Take the left side point of the fold from step 12, and fold it inwards so the point aligns with the vertical center crease. Crease firmly. You should now have a shape that resembles a kite with two little flaps at the top.
15. Look at the two little triangular flaps at the top. Take the tip of the right flap and fold it downwards so that the point meets the horizontal edge of the kite shape below it. Crease firmly.
16. Repeat step 15 with the left flap. Take the tip of the left flap and fold it downwards so that the point meets the horizontal edge of the kite shape below it. Crease firmly.
17. Now, look at the very top edge of your model. There are two points sticking up. Take the tip of the right-hand top point and fold it downwards and slightly outwards. You’re aiming to round off the top edge of the heart. Experiment a little with the angle and how far down you fold it to get a pleasing curve. Crease firmly.
18. Repeat step 17 with the left-hand top point. Fold it downwards and slightly outwards to mirror the right side and round off the top edge. Crease firmly.
19. Flip the entire model over. You should now see the distinct shape of your 3D origami heart! You can gently puff it out by lightly pressing on the sides if you wish, to enhance its 3D appearance.
Congratulations, you’ve just folded your very own 3D origami heart!
Common Pitfalls for Beginners and How to Avoid Them
It’s perfectly normal to encounter a few hiccups when you’re learning origami. Here are a couple of common places beginners tend to go wrong with this heart model, and how to overcome them:
* **Uneven or Soft Creases:** This is probably the most common issue. If your creases aren’t sharp, the paper won’t hold its shape well, and the folds won’t align as neatly.
* **How to Avoid:** Always take your time to perfectly align the edges or corners you are bringing together *before* creasing. Once aligned, use the pad of your finger, your thumbnail, or a bone folder to firmly run along the entire length of the fold. Imagine you’re trying to make an impression that will last! If a crease isn’t sharp enough, don’t be afraid to go over it again.
* **Misaligning Folds in Steps 13 & 14 (and 15 & 16):** When you fold the points to the center line (steps 13 and 14), and then fold down the top flaps (steps 15 and 16), it’s easy to get one side a little higher or lower than the other, or the points not meeting the center precisely. This can make the final heart look lopsided.
* **How to Avoid:** In steps 13 and 14, pay very close attention to making sure the points you are folding inwards touch the vertical center crease exactly. For steps 15 and 16, try to visually match the horizontal line of the fold to the existing edge of the kite shape. If one side looks slightly off, gently unfold and refold it until it’s symmetrical with the other side. Symmetry is key for a balanced heart!
Don’t get discouraged if your first few hearts aren’t perfect. Each fold is a learning experience, and you’ll get better with every attempt!
Varying Your Heart: A Touch of Personalization
The beauty of origami is its versatility. Once you’ve mastered the basic heart, you can play around with different variations:
* **Size:** As mentioned, a 6-inch square is a great starting point. For smaller, daintier hearts, try a 3-inch or 4-inch square. For larger, more prominent hearts, use an 8-inch or even 10-inch square. Remember that as you increase the size, the folds will become slightly more substantial to manage.
* **Paper Pattern & Colour:** This is where you can really let your creativity shine!
* **Patterns:** Floral, polka dots, stripes, geometric patterns – any patterned paper can create a unique heart. Consider the scale of the pattern relative to the size of your heart.
* **Colours:** Beyond the classic red and pink, think about gold or silver for a touch of elegance, blues and purples for a more modern feel, or even black for a sophisticated statement.
* **Textured Paper:** Papers with subtle textures can add another dimension to your heart.
* **Double-Sided Magic:** If you have double-sided origami paper with different colours on each side, you can create a heart that transitions in colour. For example, you could have a predominantly red heart with subtle hints of pink peeking through on the edges, depending on how you fold and present it.
Displaying and Gifting Your Handmade Treasure
Your beautiful 3D origami hearts are ready to be shared! Here are some ideas for how to present your creations:
* **Valentine’s Card Embellishment:** Glue your heart onto a plain card for an instant, impactful Valentine’s message.
* **Gift Topper:** Instead of a traditional ribbon, tie your heart onto a gift box. It’s a charming and personal touch.
* **Valentine’s Garland:** String several hearts together with thin string or thread to create a lovely decorative garland for your home.
* **Table Decor:** Scatter a few hearts on your Valentine’s Day dinner table for a festive and romantic atmosphere.
* **Gift for a Friend:** A handmade heart is a thoughtful gesture for friends, family members, or even colleagues.
* **Desk Decor:** Place a heart on your desk or shelf as a sweet reminder of love and creativity.
* **Part of a Larger Gift:** Include a heart alongside chocolates, flowers, or another gift for an extra special presentation.
I truly hope you enjoy making these 3D origami hearts as much as I do. They are such a simple yet meaningful way to show someone you care. Happy folding and a very happy Valentine’s Day to you!
Conclusion
You’ve done it! You’ve created a beautiful 3D heart, perfect for showing your Valentine just how much you care. Don’t worry if your first attempt isn’t absolutely flawless; every folded masterpiece starts with practice, and the joy is in the making. We encourage you to share your gorgeous 3D heart with your loved one, or even post a picture online! For your next challenge, why not try making a paper 3D heart in a different color or size? Or perhaps experiment with adding a small embellishment? We hope you’ve enjoyed this tutorial and are inspired to explore more delightful paper projects with us!